Project 2b Redo – Still Life, Lighting, and Flash
The objective of this exercise was to get me to muck around with a home-made reflector and see the difference that lighting can make. I previously posted this exercise, with mixed results, so I decided to try a “do-over”.
Project #2b
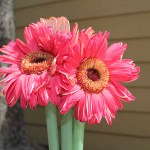
With camera on a tripod, capture a stationary still life (I chose flowers) outside 5′-6′ away from a background. In manual, take a photo without flash. Take a second photo with camera in manual, balance the light meter, and then turn on the flash. Take another photo using the light reflector.
I have reduced the quality of the photos to bring the file size down to ~700 kb.

No flash / No reflectors

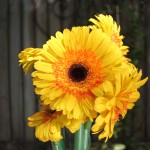
Flash / No reflector

Flash / Reflector from lower left

No Flash: F/stop 8 - Shutter 1/160

Flash: F/stop 8 - Shutter 1/160
Learnings:
- Better note-taking during the shoot definitely helps when I go to post my pictures!
- When using a flash on very bright days, make sure to use an f/stop that allows the meter to stay balanced when using the flash.
Verdict: Project 2b-redo is a success.
Projects #2a and #2b- Still Life, Lighting, and Flash
The objective of this exercise was to get me to muck around with a home-made reflector and see the difference that lighting can make. This project has two parts.
Project #2a
With camera on a tripod, capture a stationary still life (I chose flowers) outside 5′-6′ away from a background. In manual, take a photo. Take a second photo reflecting light on the still life with the reflector. Take two more reflecting light in different places on the object.
Project #2b
This time around we do the same thing, but with a flash.
In manual, take a photo without flash. Take a second photo with camera in manual, balance the light meter, and then turn on the flash. The next few photos should be the same setting but with light reflecting on the still life with the reflector.
I have reduced the quality of the photos to bring the file size down to ~700 kb.
Learnings:
- I need to start taking better notes while I am shooting these homework photos!
- When using reflectors, make sure the reflector is not in the shot!
- I need to work on my flash skills. The photos with the flash look overexposed to me. This could also be because the clouds were coming and going, and the instructions said to use the same settings as the first flash photo. The background looks like the sun came out in the bright photos, so I probably was overexposed!
Verdict: 50/50
In 2a, I was able to see a difference in the photos when I used the reflectors, and a difference based on where I used them, even with my hooptie home-made reflector. Project #2a is a success!
With 2b I’m debating trying this one again when the main lighting (i.e. the sun) is more consistent. I know the idea was that the flash fills out the shadows on the object, but it’s hard to see in these photos. Maybe I’ll go back and redo this one if I have time.
Project #1a – Stationary Still Life Outside

Stationary still life outside, with background 5-6 ft in the distance. Get as close as possible, set aperture 4.5, balance meter, and take photo. Same for apertures 5.6, 6.8, 8, 11, 16, 22, and 32.
Sorry to bore you with this one, but here are the results… The subjects are my daughter’s animals from her water table.

The slideshow below has the project photos. The point of this project is to see how the background goes from blurry to clear as the aperture increases. The photos have been decreased in “quality” from 12 to 6 in order to reduce the file size to roughly 800 kb.
Personal critique: I think I should have selected a more exciting background, and perhaps not shot so close to the elephant (although the project instructions said to get as close as possible). However, I guess the point of this shot wasn’t for the pictures to be pretty, but to see the changes in the background, which I did. Therefore Project #1a is a success, as per the homework assignment.
